Introduction
ComfyUI is a powerful and modular graphical user interface for Stable Diffusion, an open-source text-to-image AI model. Unlike other interfaces that hide the underlying process, ComfyUI exposes the entire workflow as a graph of connected nodes. This gives you incredible flexibility and control over the image generation process.
While it might look intimidating at first, its node-based system is logical and allows for creating complex, repeatable, and shareable workflows. This guide will walk you through the entire process of installing and running ComfyUI on your MacBook, specifically targeting Apple Silicon (M1, M2, M3) chips.
Prerequisites
Before we begin, make sure you have the following tools and environment set up correctly.
-
Conda: For managing Python environments,
condais highly recommended to avoid conflicts with system Python. If you don’t have it, download and install Miniconda.curl -O https://repo.anaconda.com/miniconda/Miniconda3-latest-MacOSX-arm64.sh sh Miniconda3-latest-MacOSX-arm64.sh -
Homebrew: The essential package manager for macOS. We’ll use it for
gitandcmake. If you don’t have it, open your Terminal and run:/bin/bash -c "$(curl -fsSL https://raw.githubusercontent.com/Homebrew/install/HEAD/install.sh)" -
Git and CMake: Use Homebrew to install these necessary tools.
brew install git cmake
Installation Steps
With the prerequisites out of the way, let’s get ComfyUI set up.
1. Create and Activate a Conda Environment
To keep our project dependencies isolated, let’s create a new environment for ComfyUI. We’ll use Python 3.11.
```bash
conda create -n comfyui python=3.11
conda activate comfyui
```
You must activate this environment (conda activate comfyui) every time you want to run ComfyUI.
2. Install PyTorch with Apple Metal Support
This is the most critical step for performance on Apple Silicon. We will install the appropriate version of PyTorch that can leverage the Metal Performance Shaders (MPS) backend. For the latest installation command, it’s always best to refer to the official Apple Developer documentation for PyTorch.
As of this writing, the recommended command is:
```bash
pip3 install --pre torch torchvision torchaudio --extra-index-url https://download.pytorch.org/whl/nightly/cpu
```
3. Clone the ComfyUI Repository
Navigate to where you want to install ComfyUI (e.g., your home directory or a dedicated Projects folder). Then, clone the official repository from GitHub.
```bash
git clone https://github.com/comfyanonymous/ComfyUI.git
cd ComfyUI
```
4. Install ComfyUI’s Python Dependencies
Now that PyTorch is installed, we can install the remaining packages listed in ComfyUI’s requirements.txt file.
```bash
pip install -r requirements.txt
```
5. Place Your Model Checkpoint
ComfyUI is just an interface; it needs a model to generate images. These are large files (typically 2-7 GB) with a .ckpt or .safetensors extension.
- A great place to start is the official Stable Diffusion and FLUX model. For the details, you can refer to Github.
- Websites like Civitai are also popular for finding custom models.
Take the Stable Diffusion model file you downloaded earlier (.safetensors or .ckpt) and place it inside the correct folder within the ComfyUI directory.
Running ComfyUI
Once the installation is complete, you’re ready to launch the application.
-
Make sure you are in the
ComfyUIdirectory and your conda environment is active (conda activate comfyui). -
Run the main Python script:
python main.py -
After a few moments, you’ll see some output in the terminal, and your default web browser should automatically open a new tab with the ComfyUI interface, loaded from
http://127.0.0.1:8188.
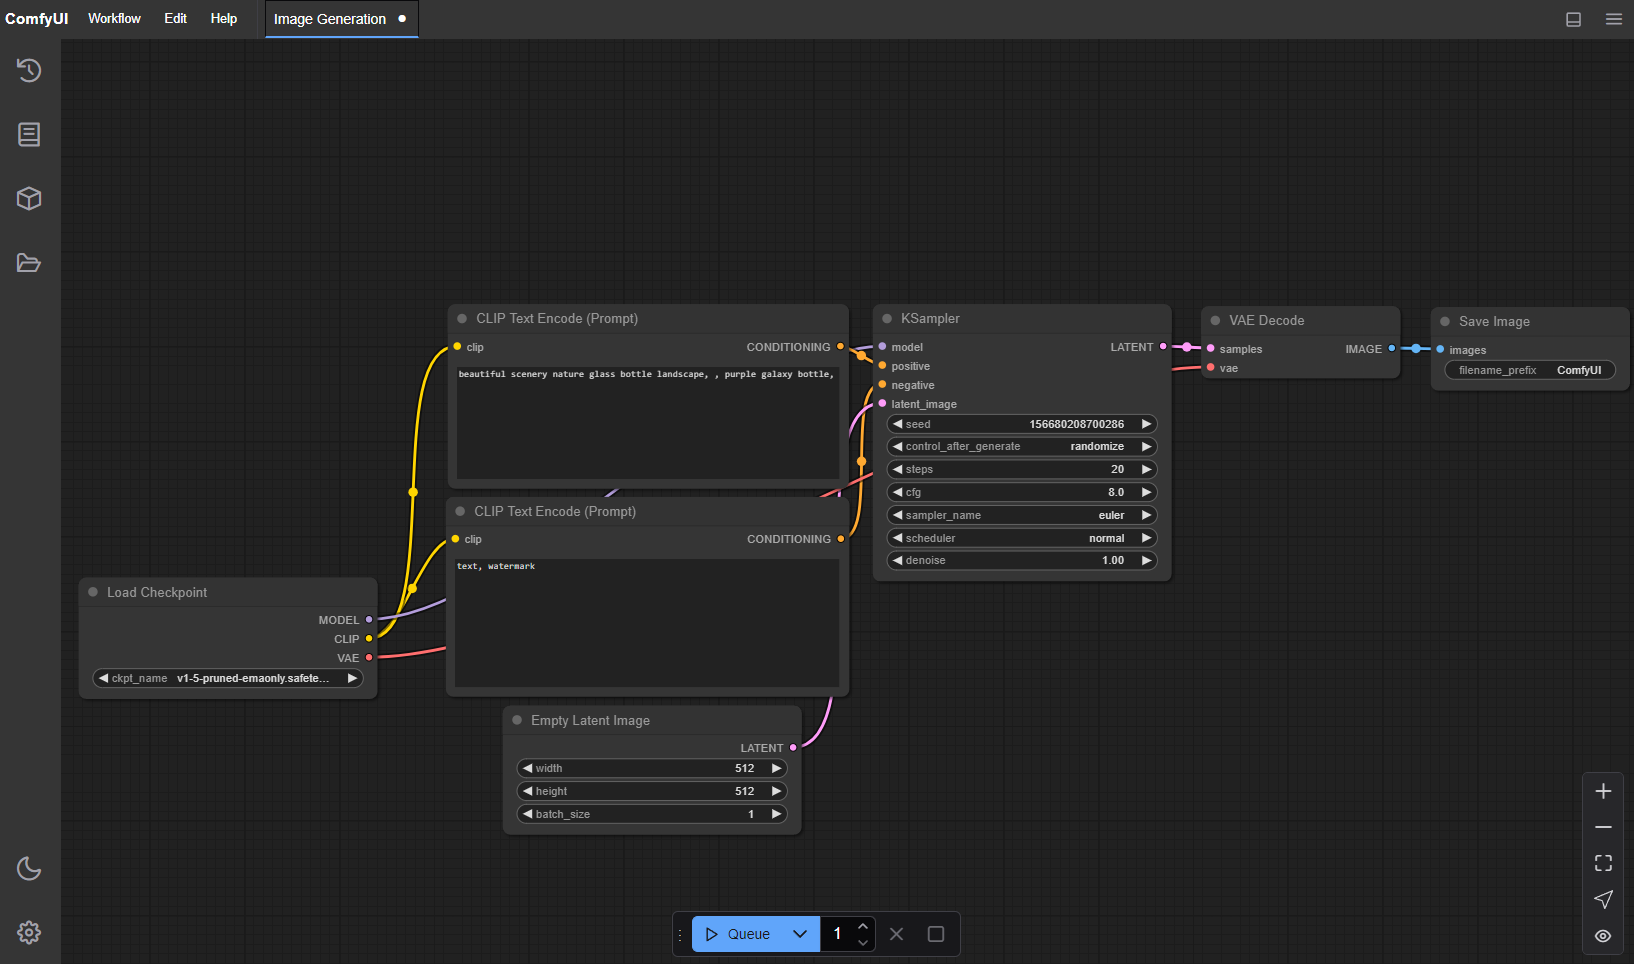
Your First Image: A “Hello, World!” Example
The default interface shows a simple text-to-image workflow. Here’s a quick breakdown of the nodes:
- Load Checkpoint (Left): This node is where you select your AI model. Click the dropdown and choose the
.safetensorsfile you added earlier. - CLIP Text Encode (Prompt): You’ll see two of these. The top one is for your positive prompt (what you want to see), and the bottom one is for your negative prompt (what you don’t want to see).
- In the positive prompt, type something like:
a beautiful photograph of a majestic cat sitting on a windowsill, golden hour lighting. - In the negative prompt, you can add terms to avoid, like:
blurry, cartoon, ugly, deformed.
- In the positive prompt, type something like:
- KSampler: This is the heart of the process. It takes the prompt and an initial noisy image (from the “Empty Latent Image” node) and refines it into your final image based on the model’s guidance. You can leave the settings (
seed,steps,cfg) at their defaults for now. - VAE Decode: This node translates the abstract “latent” image from the KSampler into a regular pixel-based image that you can see.
- Save Image (Right): The final, generated image will appear here. It’s also automatically saved to the
ComfyUI/output/folder.
To generate your image, click the Queue Prompt button on the right-hand menu. You’ll see the nodes light up with a green border as they execute in sequence. In a few moments, your first AI-generated image will appear!
What’s Next?
You’ve only scratched the surface. The real power of ComfyUI comes from its extensibility:
- ComfyUI Manager: The first thing you should install is the ComfyUI Manager. It’s a custom node that lets you easily install, update, and manage hundreds of other custom nodes and models directly within the interface.
- Explore Workflows: Search for ComfyUI workflows online. You can drag-and-drop images generated with ComfyUI directly onto the interface, and it will load the entire node graph that was used to create it.
- Learn about LoRAs, ControlNet, and IPAdapters: These are advanced techniques that allow for fine-grained control over character style, poses, and composition.
Welcome to the world of node-based AI art. Have fun exploring!